Arts & Crafts Floor Lamp

Brewster

New member
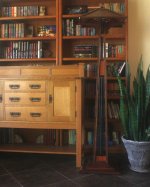
Made this for a client.

About 5' tall
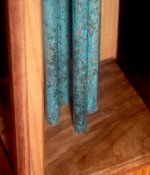
Mica paneled shade, walnut frame, rosewood and ammonia patina copper accents.

Thanks for viewing!
 

Attachments

  • IMG_7875.jpg
    IMG_7875.jpg
    307.2 KB · Views: 23
  • IMG_7862.jpg
    IMG_7862.jpg
    330.2 KB · Views: 23
  • IMG_7856.jpg
    IMG_7856.jpg
    147.2 KB · Views: 22
  • IMG_7848.jpg
    IMG_7848.jpg
    92.9 KB · Views: 15
  • IMG_7871.jpg
    IMG_7871.jpg
    212.4 KB · Views: 16
  • IMG_7864.jpg
    IMG_7864.jpg
    243.7 KB · Views: 19

larry.thomson

Moderator
that is just beautiful -- bet the client was very, very pleased -- would love to hear more details about the construction -- how you put it all together -- how you fashioned the posts -- the lines of the wings (apologies if not the correct term) at the top are so graceful -- just beautiful -- THANK YOU for sharing the project --
 

Brewster

New member
Thanks for the comment Larry 8^)

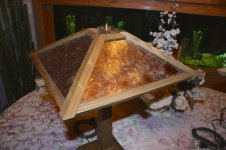
The shade is just a scaled up version of a pair of lamps posted here a while back. trapezoidal frames with all the goofy angles. Here is a more detailed photo that shows the basic shade layout.

What you called "wings" are what I call corbels. Not really sure of their names but they look like the arm supports on A&C arm chairs.
Profiled with a router template and tenoned into the main post.

The post is four 1"x1" walnut lengths which are glued/screwed to the three intermediate blocks (rosewood capped with walnut) To hide the screws and provide more edges, I added 3/8" strips along the outside edges.

I hate exposed wiring so the power is routed though the inside of one (of four) 3/8" copper pipes in the lower half, this is then routed the rest of the way through a 3/4" copper pipe to the light cluster (vintage styled LED bulbs for the warmth and glow versus intense light).
The base is just a layer cake of mitered and splined frames (about 19" square at the base feet). Plenty of mass to keep it from being easily tipped over.

Really just a project of angles and all the grief of dealing with them!
 

Attachments

  • IMG_5432.jpg
    IMG_5432.jpg
    268.6 KB · Views: 8
  • IMG_7841.jpg
    IMG_7841.jpg
    155.3 KB · Views: 7

Ray

Member
Very nice. A lot of pieces had to come together correctly! Curious, but did you also make the cabinet sitting to the left of the lamp? Looks like quarter-sawed white oak.
 

Brewster

New member
Hello Ray,
Thanks!

That side board was made last year and is QSWO and rift sawn. It's based on a Paolini piece from FWW May, 2015 so I can't take credit for the design. I did however make a few changes. It's sitting in front of the book case until I finish the room where it is intended to stay.
 

C26sailor

New member
Brewster

VERY NICE work! I have always been a fan of arts and crafts furniture. I really wish we had started decorating our home with arts and crafts designs because I would love to build some of the pieces I have seen, like your lamp for example. I'm also a fan of quartered white oak which is often used in arts and crafts projects.
 

larry.thomson

Moderator
thank you brewster for the detail -- getting all those pieces to fit as perfectly as you did is really impressive -- making things fit like that is what i find so satisfying in woodworking and i am in awe of the level of precision displayed in your piece --
 

larry.thomson

Moderator
the discussion about the QSWO wood exposed perhaps my weakest skill as a woodworker -- reading / accounting for / dealing with grain in my projects -- i have read opinions from one side to the other in regard to whether grain direction or final appearance is more important -- for example -- lets say i have 4 flat sawn walnut boards i want to use for a table top -- jointed and planed to 3/4 x 6 x 25" -- i lay them out so the grain patterns (cathedral ??) are opposite board to board -- but the presentation of the set would look better if i flipped one of the interior boards over -- colors, grain appearance in the flat side match the neighbors better in my eye -- is that a short-sided decision ? am i building in an issue that will eventually compromise the integrity of the piece -- if the table top is glued to the sides adding floating mortise/tenon joints as well -- would that help mitigate the grain direction lay out -- if you added T/G joints between 2 boards that have the same grain presentation -- can that override the pressure of the wood to cup or not make any difference --

it is an area of woodworking i know i should be paying more attention to and one that possibly can only be mastered by experience -- given that statistically, i doubt i have the time left to gain that experience so i am hoping you guys who already have that experience will share your thoughts with this relative newbie -- many thanks

larry
 

Brewster

New member
Hi C26, I feel your pain ;)

I'm still searching for the right finish "tone" and style for the house projects. Everything here is slightly different. I suppose at soem point I can just clear it all out then start over!

Larry, I feel the concept of alternating grain direction for table tops was always a reasonable approach to minimize the collective effect of board cupping, but it was elevated to gospel by "The Norm" in his TV show.

Wood will be wood and do whatever it wants as far as movement, we can control it, but not eliminate it.
My mantra is to always seek the "best" visual appearance. This is one of the places where the craftsman can fine tune their project versus the factory, where they typically ignore the choice.

That said, the long grain joint between two boards provides ultimate glue bond strength, You can add splines/biscuits/dominos for help with alignment, but the joint itself should not fail.
To control warping, first step is to acclimate your stock to your environment before you begin. This will allow you to plane/joint out the bulk of any cupping or bowing before assembly.

Once glued into a full sized surface, table tops can have hidden support like cross bars dovetailed or screwed in from below (still allowing for wood expansion/contraction), or have breadboard style ends that keep it all flat.

Attachment to the table base along the perimeter with "figure 8's" or "Z" clips will also provide significant structure to keep the top flat.

The key idea is to provide a way for the wood to move in any joints that have cross-grain connections.
 
Last edited:

C26sailor

New member
Hi C26, I feel your pain ;)

I'm still searching for the right finish "tone" and style for the house projects. Everything here is slightly different. I suppose at soem point I can just clear it all out then start over!

Larry, I feel the concept of alternating grain direction for table tops was always a reasonable approach to minimize the collective effect of board cupping, but it was elevated to gospel by "The Norm" in his TV show.

Wood will be wood and do whatever it wants as far as movement, we can control it, but not eliminate it.
My mantra is to always seek the "best" visual appearance. This is one of the places where the craftsman can fine tune their project versus the factory, where they typically ignore the choice.

That said, the long grain joint between two boards provides ultimate glue bond strength, You can add splines/biscuits/dominos for help with alignment, but the joint itself should not fail.
To control warping, first step is to acclimate your stock to your environment before you begin. This will allow you to plane/joint out the bulk of any cupping or bowing before assembly.

Once glued into a full sized surface, table tops can have hidden support like cross bars dovetailed or screwed in from below (still allowing for wood expansion/contraction), or have breadboard style ends that keep it all flat.

Attachment to the table base along the perimeter with "figure 8's" or "Z" clips will also provide significant structure to keep the top flat.

The key idea is to provide a way for the wood to move in any joints that have cross-grain connections.
Brewster

I would say our decorating style developed over the years based an a traditional theme (traditional became traditional because people like it after all) but with a more modern slant to it. I really like blending the two because today we need things built for reasons that were not even thought of in the past. We did the same thing when my wife and I built our home (ourselves). And while I really like our decorating style, I still love arts and crafts designs very very much. Make sure you post any new projects you are working on. I for one would love to see them.

Well back to Santa's workshop, seems I have over committed to projects for Christmas this year. No rest for the guy in the red suit in December.
 

Ray

Member
Picking up on the point of gluing QSWO boards together, I prefer using biscuits. I study grain patterns, colors, face matching, etc. until I'm happy with the overall look. Make sure the facings are true and guard against warping during the gluing process. For me this is a process that takes time, and I have more than once made a trip back to the lumber yard searching for the right piece to fit the puzzle. Someone ask how I got into woodworking. I told them it was similar to putting toy log homes, erector sets or legos together, but you get to make your own pieces. What fun!
 
Top